Photography

Sunday, August 14, 2011

A Quick Little Project

We were quite busy this weekend between a trip to IKEA and our regular errands, but I did manage to whip up a little bag.

littlebag

I wanted something small that I could take with me to my evening exercise class. I needed something that would hold my keys and my class membership card, and that I could shove in the little cubby in the changing room without worrying about it.  I think this little pouch will do the trick!  The main part of the bag came from a Heather Ross fat quarter and the band, handle and lining are from Denise Schmidt’s line at Joann’s.  The bag came together really quickly and was quite easy.  The free tutorial can be found here.

Tuesday, August 9, 2011

New Friends

I received the friendship bracelets today as part of the Friendship Bracelet Swap, and boy did I luck out!  I received three and I love every one of them! 

friendship bracelets

Thanks so much Nikki and Cassie! Nikki even has a tutorial for making a super cute bracelet here.  

Sunday, August 7, 2011

One More…

Block #47  Homemaker
FWblock
This block was quite a challenge because for starters, I followed the pictures in the book and did not actually follow the instructions.  Once I realized that the block wasn’t going to go together as planned, I ripped it out and tried by following the written instructions.  The second try went much smoother but you can see I have two little puckers in the fabric, not to mention when it gets sewn into the quilt I’m going to lose some of those points. 
On a side note, today I took on another side project and created a DIY light box in the hope that I will be able to take some better photos for the blog.  I think the photo of the block above is an improvement but I still have some tweaking to do.  Anyone have any suggestions or tips on how I can get it brighter?  I’ve been toying with the exposure control but haven’t quite found the right balance yet.
FWbook

Saturday, August 6, 2011

More Farmer’s Wife Love

I finally got around to adding a few more to my FW block collection.  I’ve  been chipping away at the blocks along with my friend Samantha and  here are the newest additions:

IMG_3898

postagestampblock

IMG_3899

While I fully realize that none of these fabrics particularly go together right now, I’m hoping that mixed into 110 blocks there will be some sort of cohesion.  I must admit that I’m quite jealous of all of the beautiful blocks people are making with brighter, modern fabrics.  Unfortunately I don’t have much of a stash and a lot of the fabrics I have were given to me.  I decided to make this quilt completely scrappy and since I’ve discovered that my local quilt shop has a huge scrap bin where you buy by the ounce, I’m going to continue along with mostly traditional fabrics and own it.  I’m a little nervous about that postage stamp block fitting in but I’m going with it.

Friday, July 29, 2011

Swapping Bracelets

I don’t know why they’ve suddenly popped up, but it seems like I’m seeing friendship bracelets and tutorials for them all over the internet lately.  I got nostalgic reading about them because I remember making them when I was in school (about a million years ago). When I came across a friendship bracelet swap, I decided to wax nostalgic and sign up!  I received my 3 swapping partners in my email box today, made a quick trip to Joanns for the floss, and spent the afternoon poking around tutorials. Now I’m excited to get started!

friendship_bracelet_week_button

Sunday, July 17, 2011

Pattern Review: Beach Robe

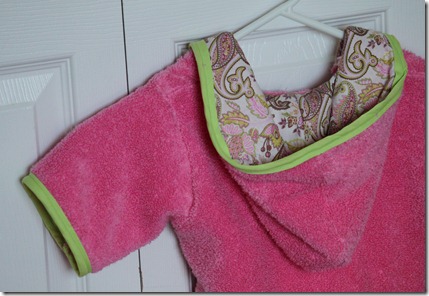
I'd been looking for something fun to make for my niece ‘s birthday in a couple of weeks. When I came across a pattern for a beach robe on the Made blog I knew it would be the perfect gift for this Florida pool baby.  I’ve read Made for a long time and Dana’s tutorials were always well written so I decided to give the Beach Robe pattern a try. Not to mention, $8 for the pattern, $5 for a towel at target and a coordinating fat quarter from my stash was a bargain for a gift. One thing I want to mention is that I really appreciate being able to download the pattern as soon as I click on “pay”.  I know this is a little thing but it’s always tough to wait for the pattern to come in my email who know how many hours after I’ve made my purchase.  I was excited to be able to see the pattern instantly.
IMG_3882

In regards to the pattern itself, it was super easy to follow.  I’m definitely what I would consider a pretty newbie sewist, and I had no problems whatsoever.  The pattern is 29 pages long, 12 of which are pattern pieces which were really easy to tape together after printing them. The only part I thought was even slightly challenging was deciding how to attach the hood.  I knew I wanted it to be lined, so I elected to lay the lining and hood right sides together and sew them leaving enough room to flip it right side out when I was done.  Then I just attached it to the top of the already constructed robe. The seam it created wasn’t too unsightly and I it was a bit easier than trying to sandwich the top of the robe between the 2 layers of the hood. I was able to make the whole robe in the course of an afternoon and am super pleased with the results.  The pictures aren’t the greatest, but I’m going to replace them with pictures of my niece in the robe once she receives it. 

IMG_3885

Tuesday, July 5, 2011

A little sparkle

I hope you had a great 4th.  Mine was low key, at home with sparklers.  Couldn’t have been better…

july4